CARDBOARD CREATIONS: NEW YORK SKYLINE SILHOUETTE

WHY I DID THIS:
Our church was doing a "Night On Broadway" event and I was asked to dress the stage with little time and a small budget. I took on the challenge. One of the elements I chose was a silhouette of the New York skyline.
Materials and tools used:
Boat load of cardboard*
Black duct tape
Gray latex interior house paint
Flat Black spray paint
Pencil
Ruler
Straight edge
Tape Measure
Utility knife - sharp
Permanent marker
Wooden yard stick or other thin piece of wood
*FREE CARDBOARD HINT: Check with furniture and lighting stores. Often times, they are willing to let you have what you want since they typically just dispose of it in one way or another anyway. Be aware that it is typical for cardboard to be available on a first come, first served basis. So, if they are willing, find out when their shipments come in and go get your cardboard!
*FREE CARDBOARD HINT: Check with furniture and lighting stores. Often times, they are willing to let you have what you want since they typically just dispose of it in one way or another anyway. Be aware that it is typical for cardboard to be available on a first come, first served basis. So, if they are willing, find out when their shipments come in and go get your cardboard!
PREPARING THE CARDBOARD:
I wasn't blogging yet when I made this, so photos were not taken during the process. Hopefully, the ideas will still come across with the photos I do have.
For my design, I needed to cover just under 24 feet across the stage with my cardboard skyline. Using black duct tape and several unfolded boxes, I assembled three 8' x 5'8" (approximately) sections of cardboard. Usually, the "lines" in the cardboard run flap to flap giving the box more strength when assembled. I took advantage of this and made sure the lines were running top to bottom to give my structure more support. You can see the positioning of the flaps in Fig. 1 and the lines Fig. 1A where the paint isn't full coverage on the bottom flaps.
I managed to get a bunch of boxes the same size which made it easy to interweave the flaps down the center of my 8 foot pieces. Note the offset. They are not lined up exactly. This is to give stability and keep the piece from folding in half from top to bottom. Once in place where I wanted them I taped them in place with black duct tape. (See Fig. 2 - You can kind of make out the interwoven flaps.) Finally, I covered the gaps between the flaps along the top edge of all three 8 foot pieces with black duct tape to make them into a solid rectangle making it easier to draw on and remain stable while cutting. (shown in Fig. 3 drawing - Those pieces of tape ended up being mostly cut off in the end but were very helpful in the process.) Since my plan was to fold the flaps along the bottom toward the back to help with support and I wasn't sure if I would need to bend the skyline vertically after I folded the flaps back, I didn't bother to cover the gaps between the bottom flaps. I was now ready to draw my skyline onto the cardboard.
For my design, I needed to cover just under 24 feet across the stage with my cardboard skyline. Using black duct tape and several unfolded boxes, I assembled three 8' x 5'8" (approximately) sections of cardboard. Usually, the "lines" in the cardboard run flap to flap giving the box more strength when assembled. I took advantage of this and made sure the lines were running top to bottom to give my structure more support. You can see the positioning of the flaps in Fig. 1 and the lines Fig. 1A where the paint isn't full coverage on the bottom flaps.
 |
Fig. 1
|
 |
| Fig. 1A |
I managed to get a bunch of boxes the same size which made it easy to interweave the flaps down the center of my 8 foot pieces. Note the offset. They are not lined up exactly. This is to give stability and keep the piece from folding in half from top to bottom. Once in place where I wanted them I taped them in place with black duct tape. (See Fig. 2 - You can kind of make out the interwoven flaps.) Finally, I covered the gaps between the flaps along the top edge of all three 8 foot pieces with black duct tape to make them into a solid rectangle making it easier to draw on and remain stable while cutting. (shown in Fig. 3 drawing - Those pieces of tape ended up being mostly cut off in the end but were very helpful in the process.) Since my plan was to fold the flaps along the bottom toward the back to help with support and I wasn't sure if I would need to bend the skyline vertically after I folded the flaps back, I didn't bother to cover the gaps between the bottom flaps. I was now ready to draw my skyline onto the cardboard.
 |
| Fig. 2 Note the offset - fold lines not lined up exactly so the piece would be less likely to fold in half. |
 |
| Fig. 3 |
DRAWING AND CUTTING THE SKYLINE:
I found a picture online of the New York skyline that I wanted to use, printed it out, then transferred the outline of the skyline onto my large pieces of cardboard using a grid. The basics: draw a grid on the paper print out and draw a grid on the cardboard. Transfer what you see on the paper grid to the cardboard grid. (see GRID TRANSFER HOW-TO below for detailed instructions) I needed to add an extra piece of cardboard to the top of the 5'8" height to make that piece tall enough for the Empire State Building.NOTE: I began the bottom of the image of the skyline at the fold above the flaps that ran along the bottom edge of my 8 foot long pieces of cardboard because of my plan to fold the flaps back to aid in stability. (see Fig. 1 above)
With a sharp utility knife, I followed the outline I had drawn and cut out the skyline. Because I had a couple layers of cardboard in various places, I used black duct tape to cover the edges to make sure pieces would stay secure after cutting out the skyline.
GRID TRANSFER HOW-TO:
I determined how many feet I needed/wanted to cover with the skyline. As I said, for my project it was 24 feet. Next I determined the scale I needed my grid to be. The paper with my selected skyline picture printed on it was 8.5" x 11". Because I was dealing with a silhouette, I could easily add another figurative inch to my picture to make my picture 12" long - easier to scale 12" to 24' than 11" to 24'. So, I put a 1 inch grid (see detailed instructions below) on my picture and ended up with 11 squares wide by 8.5 squares tall. Each square inch on my paper would be two square feet on my cardboard.
Then, in the same manner I had drawn the grid on my paper, (see detailed instructions below) I drew the 2 foot grid onto my cardboard using a pencil, tape measure and straight edge. Next, with a pencil and using what was in each square on my 1 inch paper grid as a guide, I drew my skyline picture onto the cardboard. The final step was to trace my cutting line with a permanent marker so I could easily see my cutting line against the grid lines as I cut with the utility knife. NOTE: The paint will cover the pencil lines so no need to erase. IN FACT, it is best if you do not erase any pencil lines as erasing can change the texture of the cardboard, creating blemishes that cannot be covered up by paint and may be noticeable in the reflection of stage lighting.
DETAILS ON HOW TO MAKE A GRID:
Finished Grid

1. Using a pencil (shine of the lead shows up easier against the silhouette than pen or marker), starting at the bottom left corner of the picture, mark a dot every one inch along the bottom of the entire picture marking left to right. (see Fig. 1)
2. Starting at the top left corner, mark a dot every one inch along the top of the entire picture marking left to right. (see Fig. 2) (NOTE: Always start measuring from the same side of the paper you measured for the opposite side of the paper so the markings will line up.)
3. Starting in the bottom left corner again, mark a dot every one inch up the left side of the picture marking from bottom to top. (see Fig. 3)
4. Starting in the bottom right corner, mark a dot every one inch up the right side of the picture marking from bottom to top. (see Fig. 4) (Again, measuring in the same direction across the page.)
5. Draw the grid lines by drawing lines between the corresponding dots from left to right and top to bottom. (see Fig. 5 and Fig. 6)
 |
| Fig. 1 |
 |
| Fig. 2 |
 |
| Fig. 3 |
 |
| Fig. 4 |
 |
| Fig. 5 |
 |
| Fig. 6 |
PAINTING THE SKYLINE:
Most of my painting I do in my driveway, weather permitting. Weather not permitting, I end up in the garage. However, being outside gives me more space, better ventilation and seems to make for faster drying times so, it is my preference.
Protecting the driveway from paint is important to me so I put some kind of protective covering between the piece I am painting and the driveway. Most of the time it is just scrap cardboard. It doesn't have to fit under the entire piece you are painting all at once, just under the edge where you are working since the scrap piece can be moved around as you work.
A WORD OF CAUTION: It does seem faster to roll the latex paint on, however, rolling paint onto cardboard can easily get the cardboard too wet and cause the surface to ripple and become deformed.
DECISIONS, DECISIONSA WORD OF CAUTION: It does seem faster to roll the latex paint on, however, rolling paint onto cardboard can easily get the cardboard too wet and cause the surface to ripple and become deformed.
This is where you need to decide whether to go for a solid black silhouette or go for shading and highlights...or if you are like me, decide which method of coverage is most cost effective - money and time considered. If you're going for all black you can just use black latex paint, cover the whole thing - front and back, let it dry and you're done.
HIGHLIGHT AND SHADOW
I decided to use highlight and shadow to add a feeling of depth and texture. I painted the entire cutout of the skyline, both front and back, with dark gray paint using a large brush. The gray paint was a mixture of a few buckets of dark interior house paint I got really cheap at Miller Paint. Once I mixed them all together I just happened to end up with a medium gray which was perfect. Painting full coverage with the house paint allowed me to use less spray paint later.
Once the gray was dry, I went to work with the flat black spray paint.
PERSONAL PREFERENCE: I've tried the cheap-o cans of spray paint and always end up regretting it; the spray isn't as even, it seems to require more paint to get the coverage I'm after, but mostly because the smaller style nozzle bruises my fingertip by the time I've finished my project. I definitely prefer the spray cans with the wider, finger-size nozzle.
[CAUTION: Before you begin spraying... Move vehicles out of the driveway or cover them up to avoid spray mist drifting onto your car.]
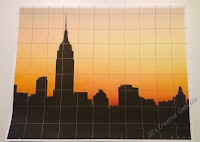
Beginning with one eight foot section, I began spraying the vertical lines for the individual buildings and down the sides so no brown of the cardboard showed on any edges exposed or not taped. When that was done, I stepped back, took a look at building placement and decided where I wanted highlight and shadow. Working in vertical lines, I continued to spray, keeping the lines closer together in places of shadow, sometimes to the point of almost full coverage, and further apart in places of highlight, blending with shots of spray paint to give the desired effect. See the shading effect in Fig. 4 below and in Fig. 1 above.
PERSONAL PREFERENCE: I've tried the cheap-o cans of spray paint and always end up regretting it; the spray isn't as even, it seems to require more paint to get the coverage I'm after, but mostly because the smaller style nozzle bruises my fingertip by the time I've finished my project. I definitely prefer the spray cans with the wider, finger-size nozzle.
Beginning with one eight foot section, I began spraying the vertical lines for the individual buildings and down the sides so no brown of the cardboard showed on any edges exposed or not taped. When that was done, I stepped back, took a look at building placement and decided where I wanted highlight and shadow. Working in vertical lines, I continued to spray, keeping the lines closer together in places of shadow, sometimes to the point of almost full coverage, and further apart in places of highlight, blending with shots of spray paint to give the desired effect. See the shading effect in Fig. 4 below and in Fig. 1 above.
 |
| Fig. 4 New York skyline showing gray and black shading |
REINFORCING THE STRUCTURE:
 |
| Supports |
NOTE: If using cardboard, make sure the "lines" in the cardboard run the length of the strip like the purple lines do in the drawing. For stronger reinforcement, use two strips taped together with duct tape.
ASSEMBLING THE SKYLINE
For this stage set I needed my silhouette to stand higher than it would if it were on the floor of the stage. I used banquet tables (3 - 8 foot tables) covered with a gold shimmery fabric I had. It made a beautiful water effect in the lighting. The gold fabric was not long enough to drape over the top and sides of the table, so I taped it to the top of the table with painter's tape...sticky enough to do the job but not so sticky it would destroy the gold on the fabric when I took it off.
 |
| Gold shimmery fabric |
 |
| Gold fabric along 3 - 8 foot tables with skylight on top |
Starting at one end, I placed the skyline on top of the taped fabric, just slightly overlapping the edges of the pieces in the middle so it would all fit. I used cylindrical touch lamps for back lighting behind the silhouette which doubled as weights to hold the structure in place.
 |
| Cylindrical Touch Lamp |
BACK LIGHTING THE SKYLINE
As I mentioned above, I used cylindrical touch lamps for lighting behind the skyline. The touch lamps have low, medium, and high settings for brightness. I used red, yellow and blue colored light bulbs to create the look of the sun setting on New York.
Light placement from left to right went as follows: Red at high, Yellow at high, Red at medium, Yellow at medium, Blue at high - the blue being under the moon.

This was great fun and I loved how it turned out! Watch for a future post on my creative storage of this set piece.


.JPG)


